Comprehensive Guide to Implementing Automated Testing in Postman: A Deep Dive
The steps to create automated testing in Postman include creating new requests, managing multiple environments using environment variables, writing test scripts, using Pre-request Scripts, and running tests and viewing results.
In today's software development process, the use of APIs (Application Programming Interfaces) has become increasingly common. APIs allow communication and data exchange between different systems, enabling complex functionality and service integration. To ensure the reliability and stability of APIs, automated testing is crucial. Postman, as a powerful API development and testing tool, plays an important role in the field of automated testing.
Primary Features of Postman
Postman is a feature-rich API development and testing tool, integrating various functionalities including:
- Request construction and sending: Postman allows users to easily build and send HTTP requests, supporting various request methods and parameters.
- Response viewing and analysis: Postman can clearly display server responses, including response status, headers, and bodies. It also provides various tools to help users analyze response data.
- Environment management: Postman supports environment management, allowing users to configure different variables and settings for different development or testing environments.
- Test script writing: Postman provides an intuitive test script editor, supporting JavaScript script writing, making it convenient for users to perform automated testing on APIs.
- Mock Server: Postman integrates Mock Server functionality, allowing users to simulate API responses, which is very suitable for API development and testing.
I. Fundamentals of Postman Automated Testing
1.1 Brief Overview of Automated Testing
Automated testing refers to the process of automatically executing test cases using tools or frameworks. It involves simulating user actions, automatically sending requests, verifying responses, and determining whether the test results meet expectations. Automated testing can significantly improve testing efficiency and coverage, and reduce human errors.
1.2 Importance of Automated Testing
The importance of automated testing lies in several reasons:
- Improved testing efficiency: Automated testing can automatically execute repetitive and tedious testing tasks, saving testers' time and energy.
- Enhanced test coverage: Automated testing can cover more test cases, increasing test coverage and discovering more potential defects.
- Increased test reliability: Automated testing can reduce human errors, improving test reliability and stability.
- Quick feedback: Automated testing can provide quick feedback, helping developers and testers discover and fix defects promptly.
- Continuous integration: Automated testing can be integrated with continuous integration tools, achieving continuous integration and delivery.
1.3 Different Types of Automated Testing
Automated testing can be divided into different types based on the granularity and scope of testing. Common types include:
- Unit testing: Unit testing involves testing the smallest independent units in software, such as functions or methods. Unit tests are usually written by developers to verify the correctness of the code.
- Integration testing: Integration testing involves testing two or more software units combined together. The main purpose of integration testing is to verify the interfaces and interactions between different units.
- System testing: System testing involves testing the entire software system. The main purpose of system testing is to verify whether the software system meets requirements and expectations.
In addition, automated testing can also be categorized into the following types:
- Functional testing: Functional testing verifies whether the software system works as expected.
- Performance testing: Performance testing measures performance metrics of the software system, such as response time and throughput.
- Security testing: Security testing verifies whether the software system can withstand security attacks.
- Compatibility testing: Compatibility testing verifies whether the software system can work properly on different environments and platforms.
Different types and categories of automated testing are suitable for different testing scenarios and requirements. Testers need to choose the appropriate types and categories of automated testing based on actual situations to achieve the best testing results.
II. Creating Automated Tests in Postman
2.1 Creating a New Request
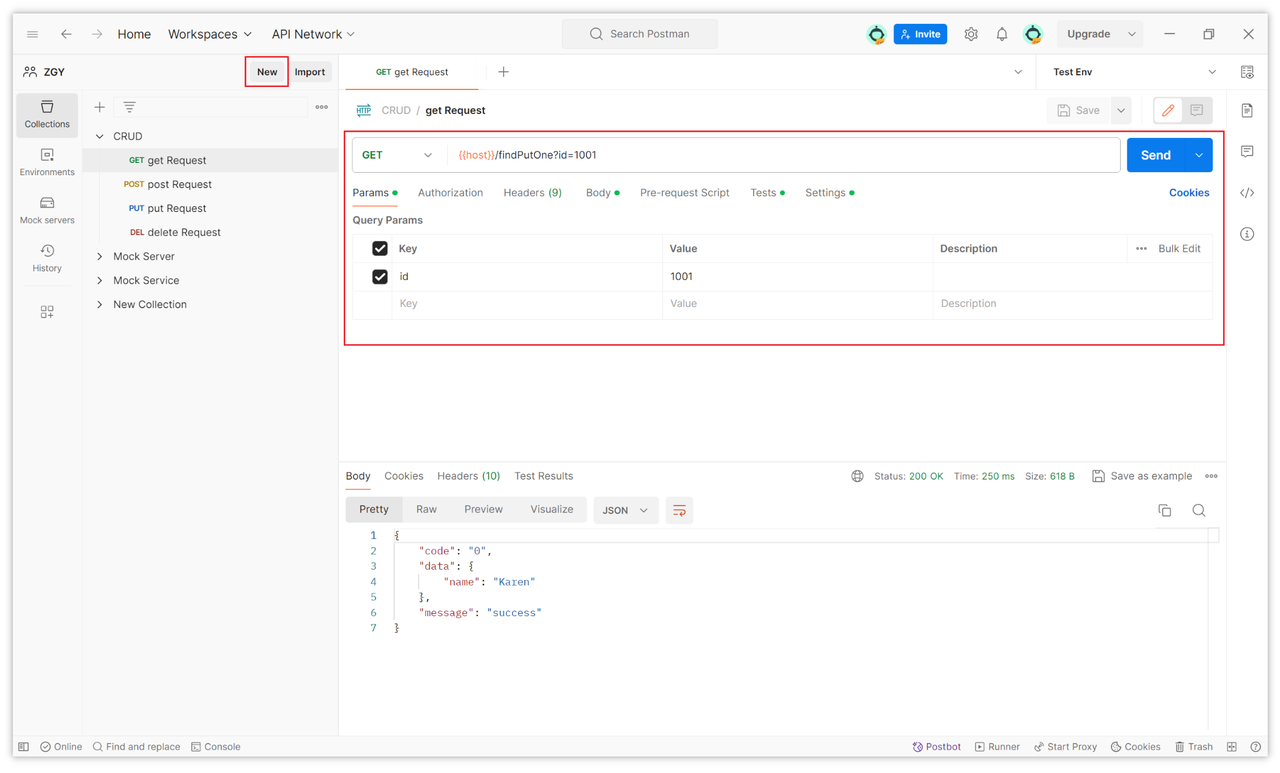
Open Postman and create a new workspace, click on the "Request" tab and select the type of request to send (e.g., GET, POST, PUT), enter the request URL in the "URL" field, select the format of the request body (e.g., JSON, XML, text) in the "Body" tab, add necessary request headers in the "Headers" tab, and add request parameters in the "Params" tab.
2.2 Managing Multiple Environments with Environment Variables
Postman's environment variable feature allows you to easily switch between different environments without changing the request URL or other settings.
Click on the "Environments" tab in the left sidebar, click the "+" button to create a new environment, and fill in the environment variable name and value.

After setting environment variables, if you want to use environment variables in requests, use the following syntax:
{{environment_variable_name}}For example, to use an environment variable named "host" in the request URL, the syntax is:
{{host}}/api/v1/users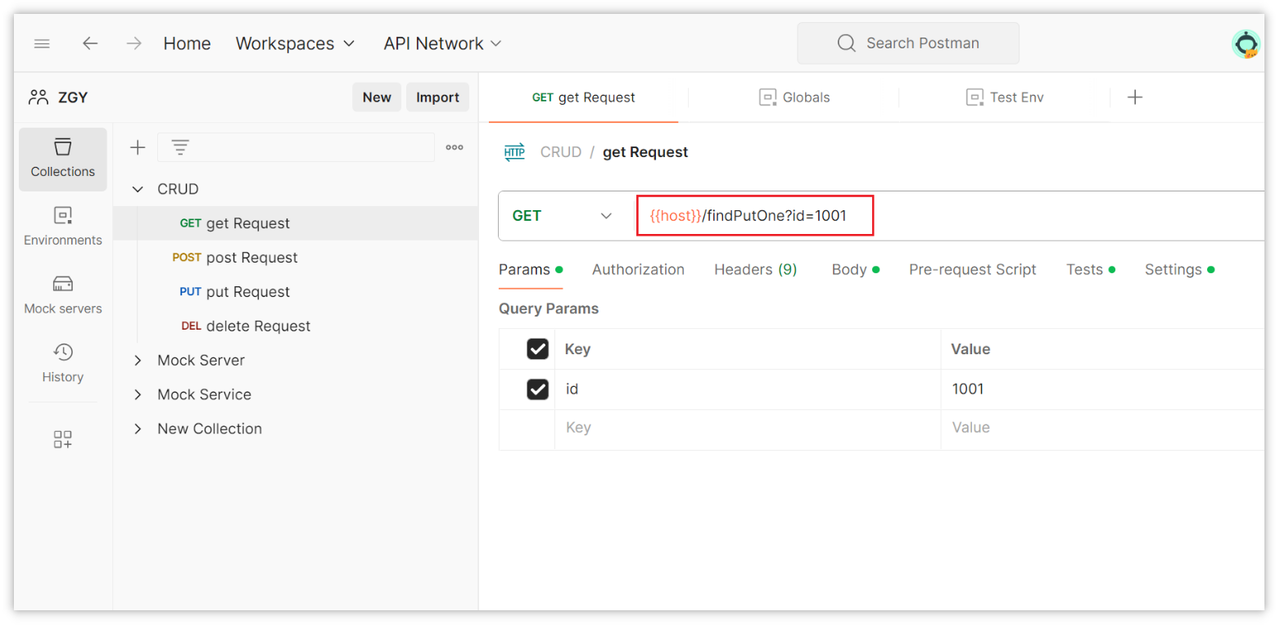
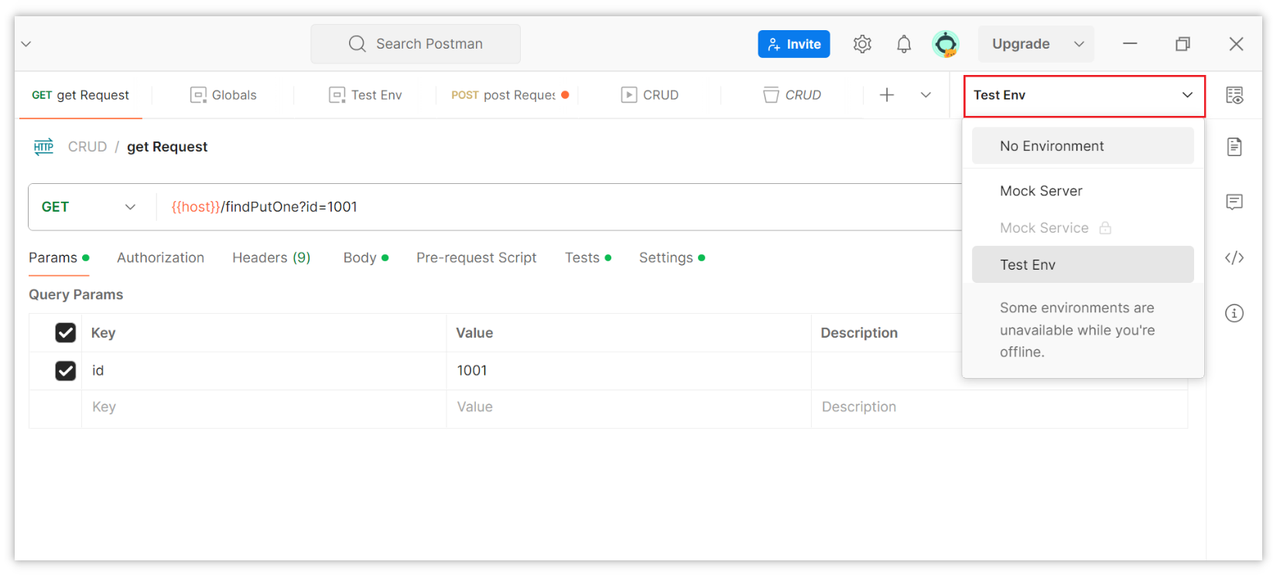
When you switch between different environments, Postman will automatically replace the values of environment variables. Click on the environment variable switch at the top right of the page to switch between environments.
2.3 Writing Test Scripts
Postman allows you to write test scripts using JavaScript in the Tests tab. Test scripts can be used to verify response status, response time, response body, etc. For example, if I want to extract the token validation field from the response returned in Postman and store it in an environment variable, how do I write the script?
{
    "code": "0",
    "data": {
        "token": "fgub938t203t9ug0j2r9it2094942"
    },
    "message": "success"
}
To extract the token validation field above into an environment variable, you can write the following script in Tests.
var body = JSON.parse(pm.request.body.raw);

var token = body.token;

console.log("Token: " + token);

pm.environment.set("token", token);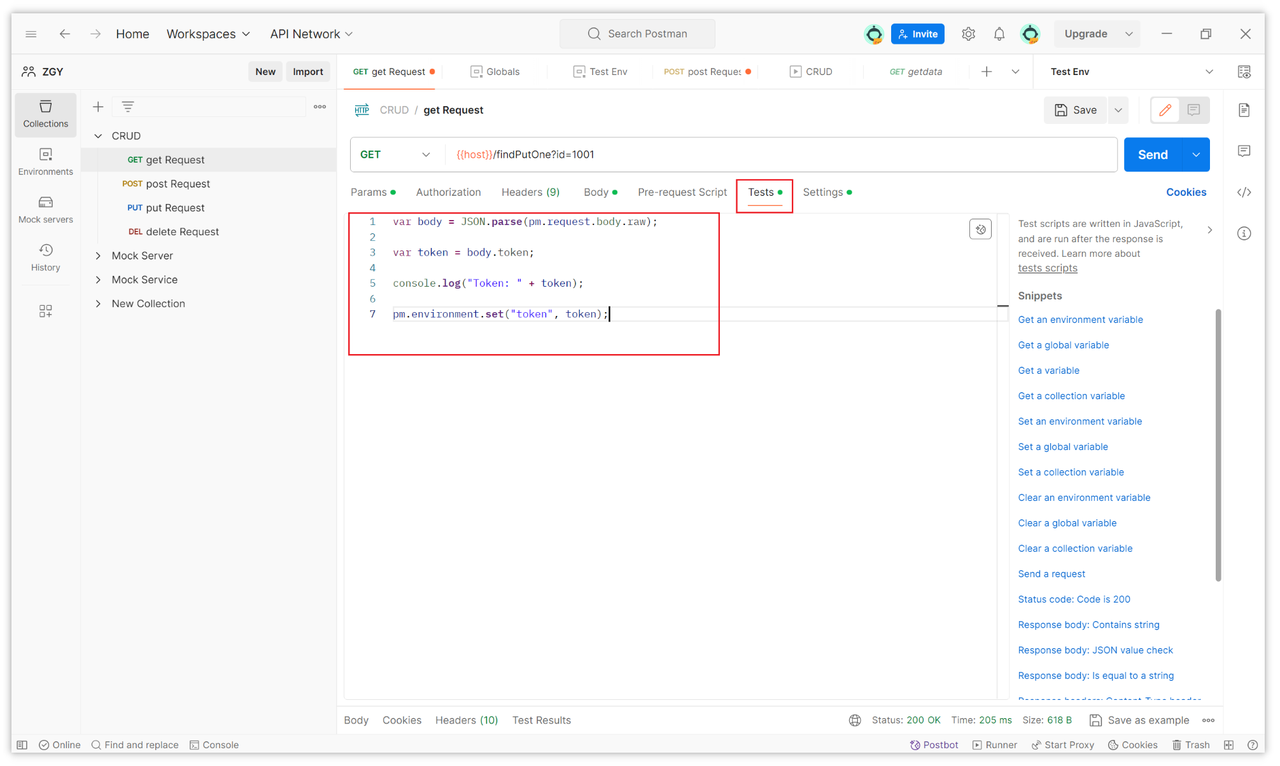
Usually, the token in the interface is used for authentication, so you need to store it in an environment variable and then globally reference this variable in Collections so that other interfaces can inherit this authentication token during testing or automated testing.
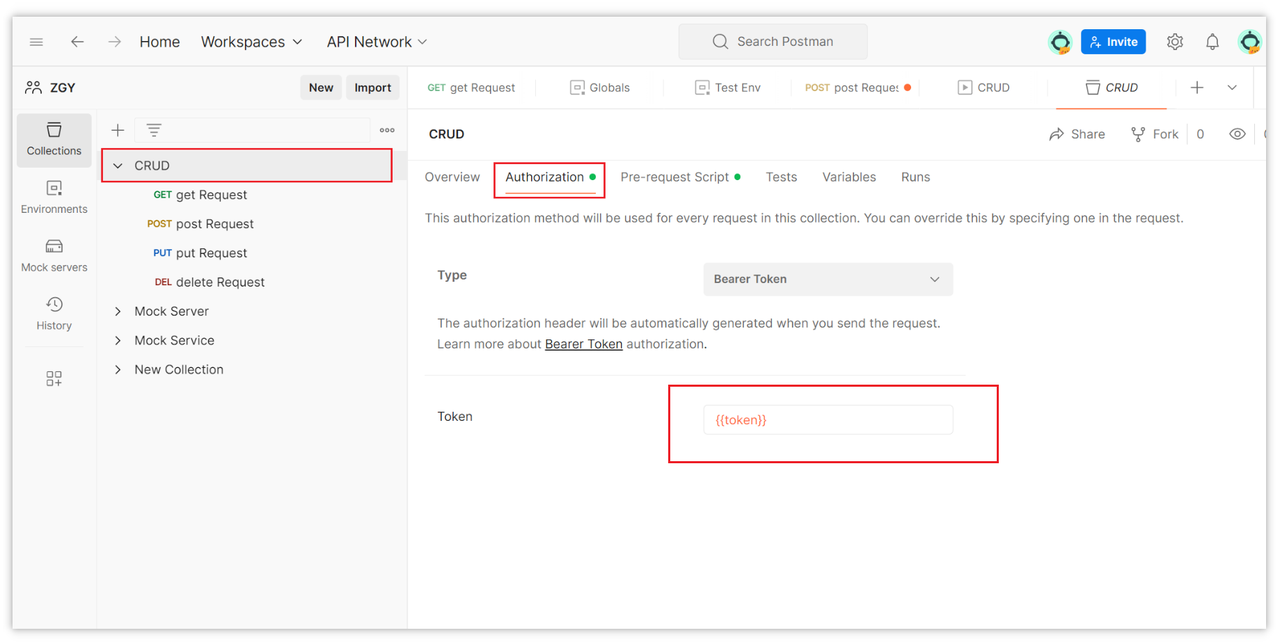
One thing to note is that after setting the authentication token in the collection, you need to select "Inherit auth from parent" in the interface, which means inheriting from the parent (inherited from the token set in the collection), otherwise it will not take effect.

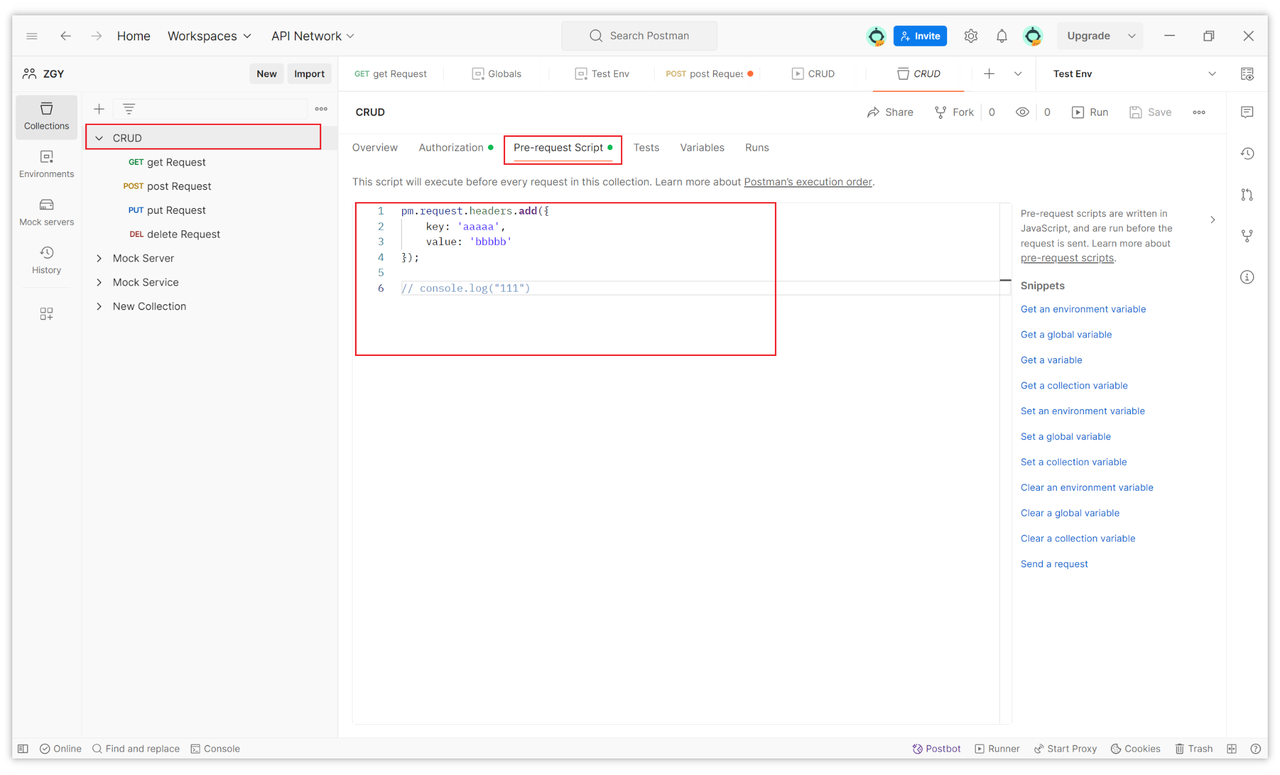
2.4 Using Pre-request Scripts
Pre-request Scripts allow you to execute scripts before sending requests. This can be used to dynamically generate request parameters, set request headers, modify request bodies, etc. For example, if you want to add some parameters to the request headers when sending requests, you can write JavaScript scripts in the Pre-request Scripts of the collection, depending on your needs, such as:
pm.request.headers.add({
    key: 'aaaaa',
    value: 'bbbbb'
});
2.5 Running Tests and Viewing Results
After completing the above steps, that is, after setting up interfaces, environments and environment variables, interface authentication verification, and request headers according to your business needs, you can try clicking the "Send" button to debug and see if it meets your initial expectations. If so, you can proceed to run automated tests in Postman.

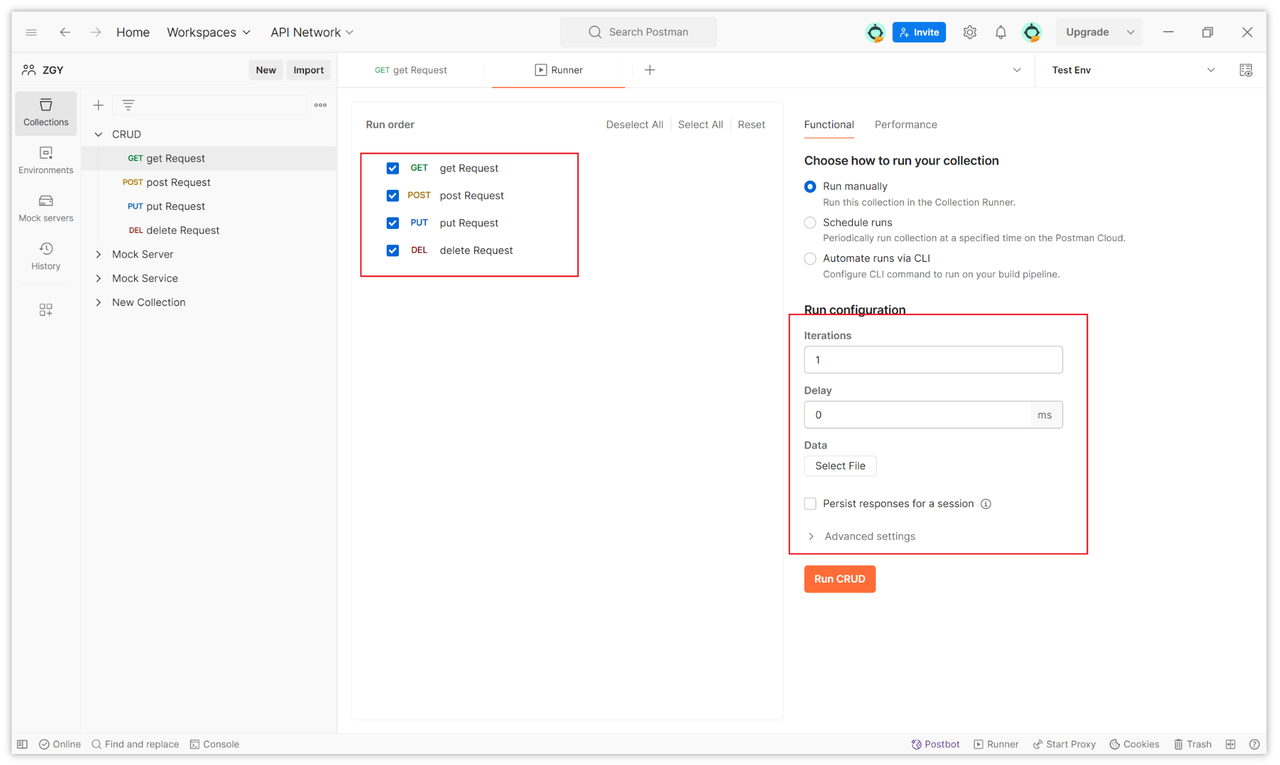
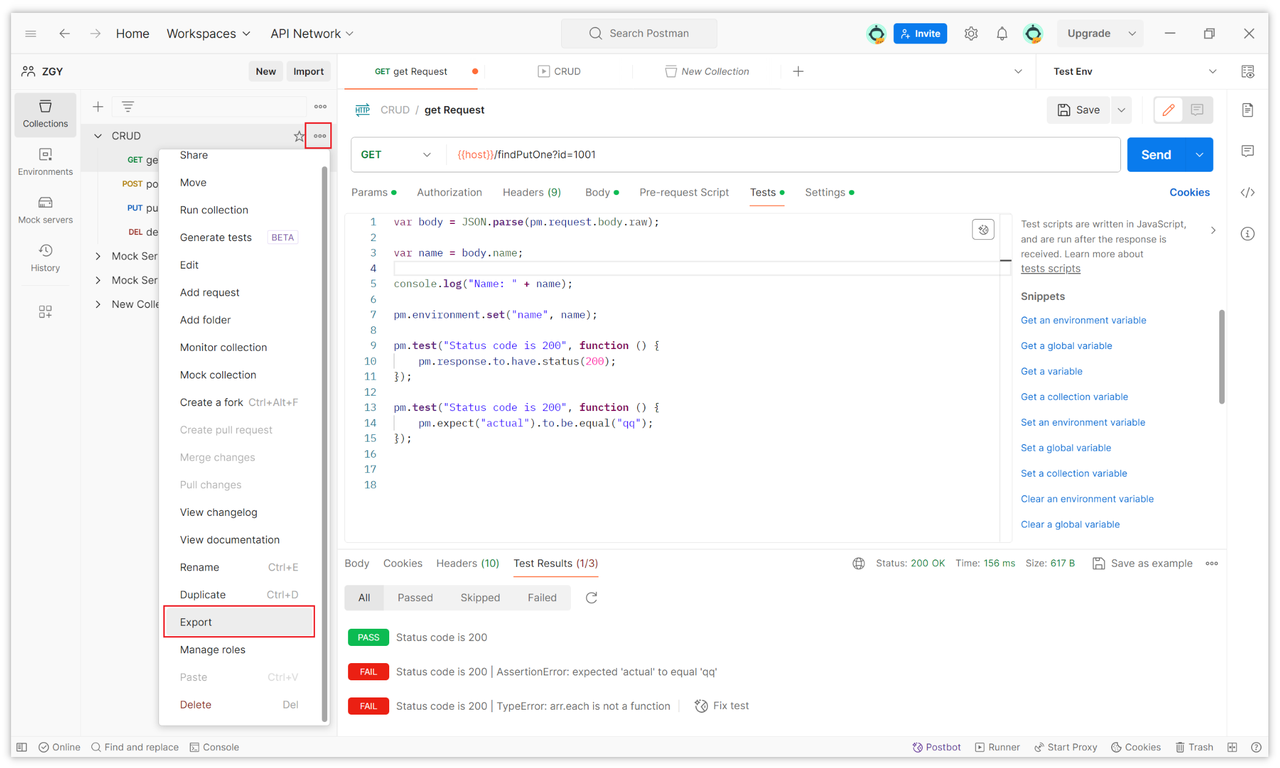
To perform automated testing in Postman, you can click on the "..." on the collection name, then click on the "Run collection" option to open the Runner page.

On the Runner page, you can select the interfaces you need to test, then choose the number of iterations, interval time, and upload data files, which contain the data needed for testing. After setting up, click "Run" to run the tests.
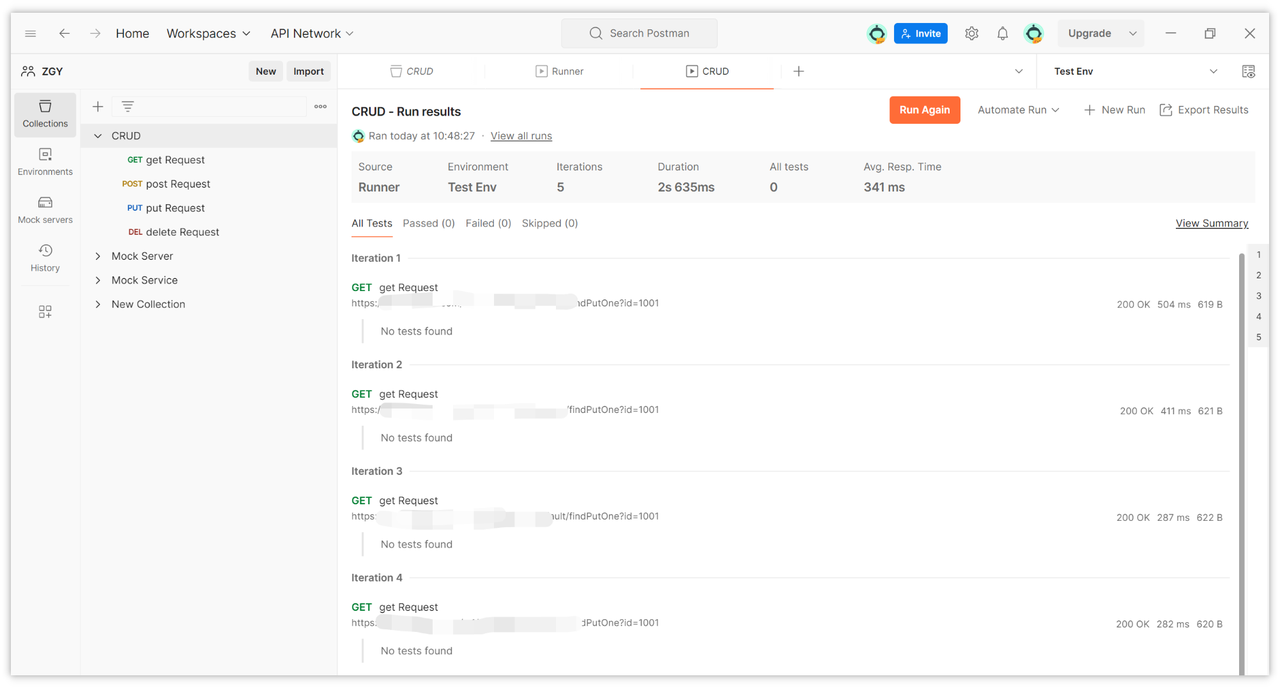
After running, you can view the execution status of each request in the Collection Runner's result window. This includes information such as response time, status code, response body, etc. In this way, a simple automated test is completed.
III. Advanced Features and Best Practices
3.1 Advanced Script Writing for Postman Automated Testing
Enhancing Test Capability with Chai Assertion Library
Chai Assertion Library is a powerful JavaScript assertion library that can help you write more complex and readable test scripts. Postman comes with the Chai Assertion Library built-in, so you can directly use Chai's assertion methods in your test scripts.
Here are some examples of Chai assertion methods:
pm.expect(actual).to.be.equal(expected);: Asserts that the actual value is equal to the expected value.pm.expect(actual).to.be.above(expected);: Asserts that the actual value is greater than the expected value.pm.expect(actual).to.be.below(expected);: Asserts that the actual value is less than the expected value.pm.expect(actual).to.include(expected);: Asserts that the actual value includes the expected value.pm.expect(actual).to.have.lengthOf(expected);: Asserts that the actual value has the specified length.
These Chai assertion methods should be used within pm.test(). In Postman, pm.test() is used to write test scripts, where you can write your test logic, including assertions. Therefore, you should place these assertion methods within pm.test() to ensure that they are correctly executed in the tests and generate corresponding test results based on the assertion results, for example:
pm.test("Status code is 200", function () {
    pm.response.to.have.status(200);
});

pm.test("Status code is 200", function () {
    pm.expect("actual").to.be.equal("qq");
});
How to Pass Data between Multiple Requests Using Environment Variables
Postman's environment variables allow you to pass data between different requests. This can be used to share some common data, such as user credentials, API keys, test data, etc. The specific steps have been covered in sections 2.2 and 2.3 above, so they will not be elaborated here. In summary, you need to set variables and variable values in the environment variables, and then reference environment variables in the Collection by using {{}}.
3.2 CI/CD Integration
How to Integrate Postman Tests into CI/CD Processes
Integrating Postman tests into CI/CD processes can help you achieve continuous integration and continuous delivery. This allows you to automatically run Postman tests after each code change and decide whether to deploy the changes to production based on the test results.Here are some steps to integrate Postman tests into CI/CD processes:
- Install Postman Newman
Postman Newman is a command-line tool that helps you run Postman tests in CI/CD processes. To install Postman Newman, follow these steps:
- Install Node.js on your CI/CD server.
- Install Postman Newman using the following command:
npm install -g newman- Export Postman Tests as JSON or Collection Files
To export Postman tests as JSON or Collection files, follow these steps:
- Open the test file you want to export in Postman.
- Click the "Export" button.
- Choose the format to export (JSON or Collection).
- Save the exported file on your CI/CD server.

- Integrate Postman Newman into Your CI/CD Tools
You can use different CI/CD tools to integrate Postman Newman. Here are some examples:
- Jenkins:
pipeline {
  agent any

  stages {
    stage('Run Postman Tests') {
      steps {
        sh 'newman run /path/to/postman_collection.json'
      }
    }
  }
}- Travis CI:
language: node_js

script:
- newman run /path/to/postman_collection.json- CircleCI:
version: 2.1
jobs:
run_postman_tests:
docker:
- image: circleci/node:latest
steps:
- checkout
- run:
name: Run Postman Tests
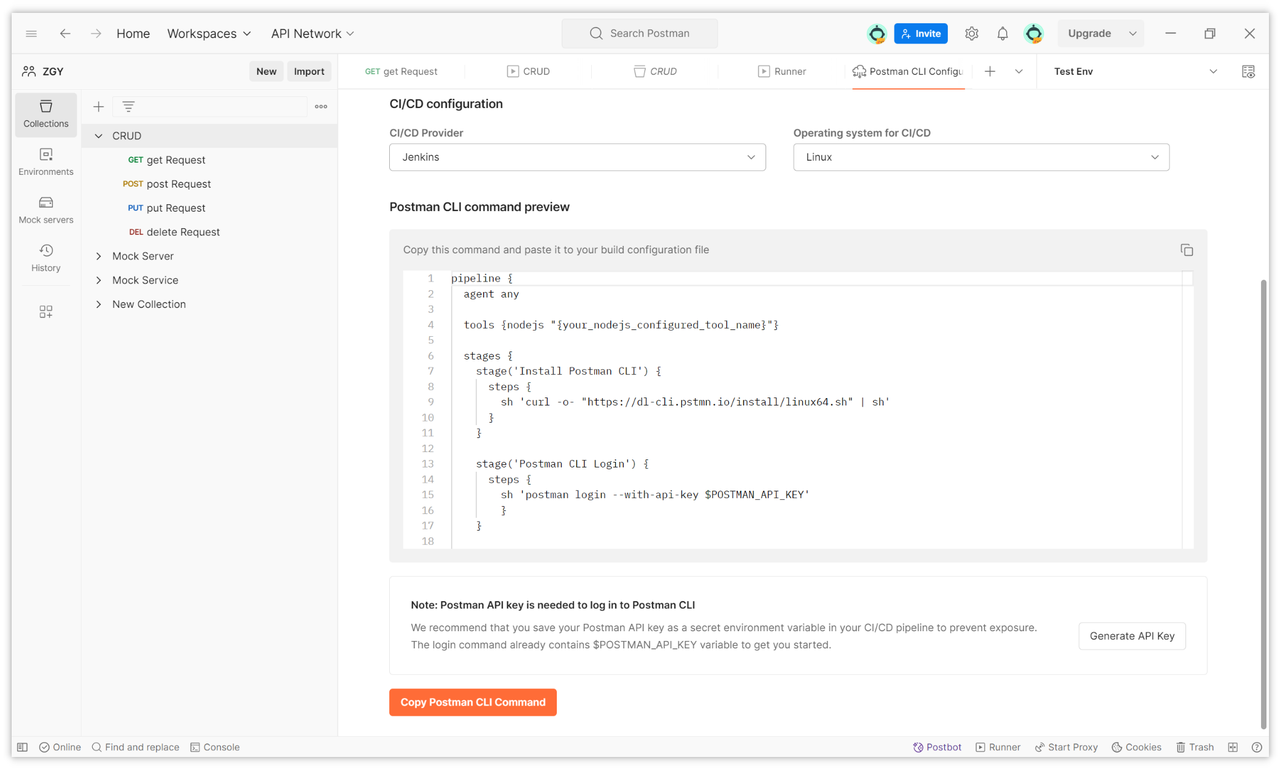
command: newman run /path/to/postman_collection.jsonThe pipeline commands above can be generated in Postman, either in the Runner page of automated testing, by clicking the "Automate runs via CLI" option, and then clicking "Configure command" at the bottom.

On the configuration page, you can select the corresponding platform (such as Jenkins, Gitlab) to generate the corresponding Postman CLI command.
3.3 Best Practices and Common Issues
Organizational Techniques for Test Cases
- Organize test cases into different collections for easier management and execution.
- Use Postman's folder feature to organize test cases.
- Write clear descriptions for each test case to understand its purpose.
- Use tags to label test cases for easier filtering and searching.
Performance and Efficiency Optimization Suggestions
- Avoid performing time-consuming operations in test scripts, such as database queries or file reads.
- Use Postman's Pre-request Scripts to set request headers and parameters instead of repeating them in each request.
- Use Postman's Tests tab to validate responses instead of using console.log() or other methods.
- Use Newman to run Postman tests instead of using the Postman GUI to improve performance.
Common Errors in Test Writing and Solutions
Error: Using pm.test() to validate response status but not specifying the status code to validate.
Solution: Use pm.test("Status code is 200", function () { pm.response.to.have.status(200); }); to validate that the response status code is 200.
Error: Using pm.expect() to validate response body but not specifying the value to validate.
Solution: Use pm.expect(pm.response.text()).to.equal("Hello, world!"); to validate that the response body is "Hello, world!".
Error: Using pm.send() to send requests but not specifying the request method.
Solution: Use pm.get(), pm.post(), pm.put(), pm.delete(), or other methods to send requests and specify the request method.
Error: Using pm.environment.get() to get environment variables but not specifying the name of the environment variable to get.
Solution: Use pm.environment.get("API_KEY") to get the environment variable named "API_KEY".
Conclusion
Postman has various features, including request building and sending, response viewing and analysis, environment management, test script writing, and Mock Server functionality. Postman's automated testing feature simulates user operations, automatically sends requests, validates responses, and determines whether the test results meet expectations, improving testing efficiency and coverage and reducing human errors.
The steps to create automated testing in Postman include creating new requests, managing multiple environments using environment variables, writing test scripts, using Pre-request Scripts, and running tests and viewing results. Advanced features include enhancing test capability with the Chai Assertion Library, passing data between multiple requests using environment variables, and integrating Postman tests into CI/CD processes. Best practices include organizational techniques for test cases, performance and efficiency optimization suggestions, and common errors in test writing and solutions.
Reference Links:
Learn more: